Every browser and email client has different support for fonts. In addition, every recipient of your emails or pages will have different fonts installed on their computers. Always include web-safe fallbacks in your font-family stack. Test your font across as many browsers and email clients as possible to ensure it is rendering as expected.
Font support in email
For maximum support, these web-safe fonts are proven to render consistently across browsers and email clients:
| SANS-SERIF | SERIF | MONOSPACE |
|
Arial Helvetica Lucida Tahoma Trebuchet Verdana |
Georgia Times |
Courier |
Looking for something more custom?
Google fonts, Adobe fonts, or self-hosted fonts can be used in your designs with a few extra steps. Email client support varies, so it requires more testing and flexibility. Start with the font you want and include a web-safe fallback that will be used where the primary font is not supported.
| EMAIL CLIENT | CUSTOM FONT SUPPORT |
| Apple Mail (MacOS, iOS) | Excellent |
| Outlook (Mac) | No longer supported in latest version (16.8). Use web-safe fonts. |
| Outlook (PC) | Not supported. Use web-safe fonts. |
| Gmail, Yahoo, Outlook.com | Not supported. Use web-safe fonts. |
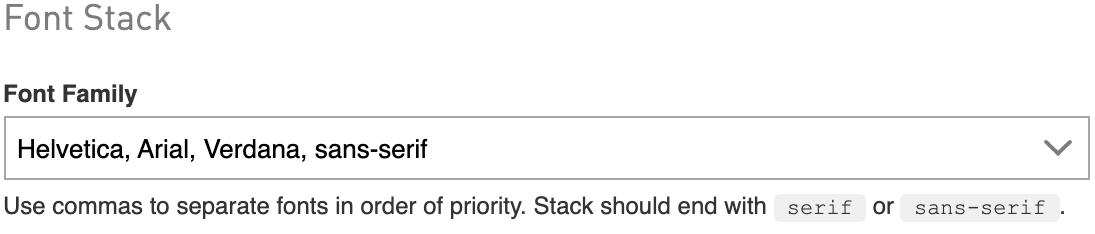
Branding: Set your brand font
Go to Account > Branding to set a default Font Family. Your font stack will then show up at the top of the Font Family dropdown in all WordFly editors. It will also load as the Base font in new emails and pages.
Branding: Set up custom fonts
- Go to Account > Branding. In the Custom Fonts section, enable the Set up custom fonts for use in emails and pages option.
- Give your font a name. We recommend something similar to the name you will enter into the Font Family field. Examples: Playfair Display, Sofia-Pro, Open Sans.
-
Paste in the @import code directly from Google or Adobe. It is acceptable to have multiple fonts inside one @import url.
Saving your custom font here will make it available in the editor. Continue to the next section to learn how to add the font to your email or page.
Examples
<style>
@font-face {
  font-family: "SELFHOSTEDNAME";
  src: url('https://www.example.com/path/folder/selfhostedfontname.woff2') format('woff2');
  font-weight: normal;
  font-style: normal;
}
</style>
Example: Self-Hosted Font
Editor: Add custom fonts to your design (Recommended method)
- In the email or page editor, click on the Settings tab.
Click the Add custom font code button.
If you do not see the button, go to Account > Branding to save your custom font (steps explained above).
- Select a font to add.
This will insert the required font code into the `<head>` of the document. Do not make edits.
Repeat Step 1 and 2 to add more fonts.
- Go to the Stylesheet tab, and open the style that should use the font.
Add the font name in the Font Family field. You must use the official font-family name from Google or Adobe. When there are spaces in the name, add quotes around the name. Examples: "Open Sans", "Playfair Display", Sofia-Pro
Remember to specify a web-safe fallback font that will be used where the custom font is not supported.
If you are adding the custom font to page designs, you must repeat steps 1 and 2 for each page in the page set.
Editor: Set a Base font for your design
In your design, you can set a global font family under Stylesheet > General Styles > Base. This will be the default font for your design.

Editor: Set a font on individual blocks
When you need to override your Base font, you can change your font in any individual text block by selecting the Styles tab and adjusting your typography elements as needed. Go to Styles > This block > Paragraph, for example.

Editor: Add custom fonts to your design (Advanced method)
We have added new tools that make this technique obsolete.
1. In Google Fonts or Adobe Fonts, find the font(s) you would like to use. You will need the @import URL for Step 4.

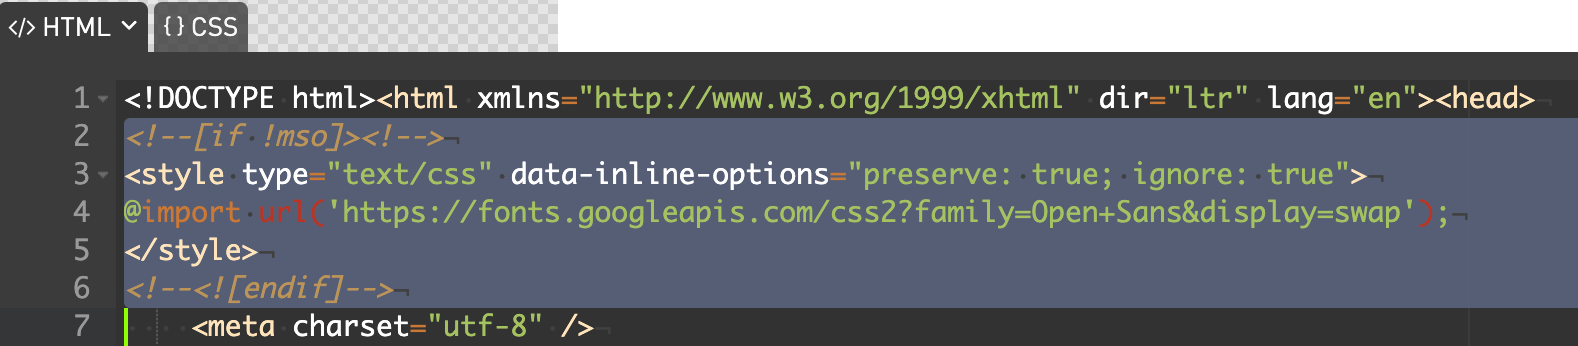
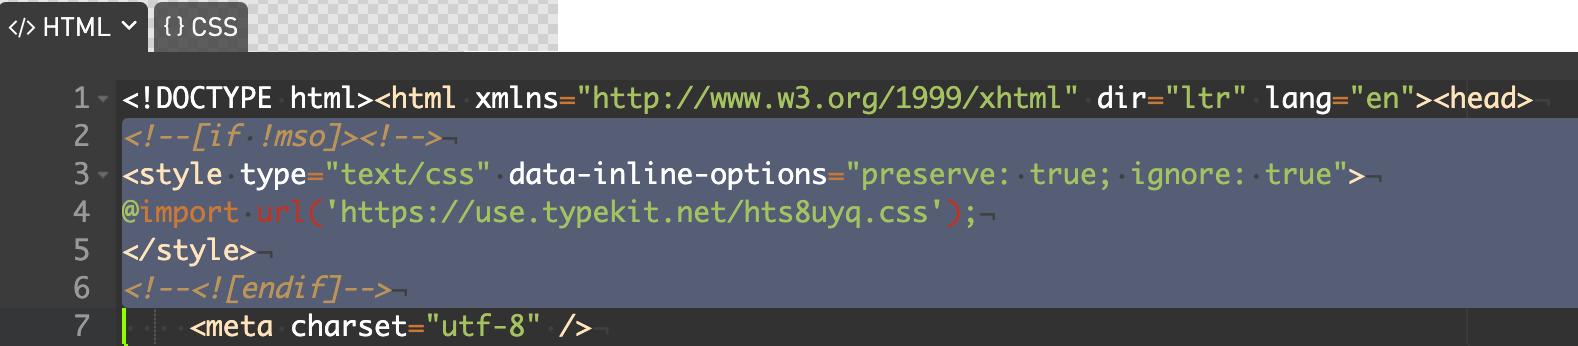
2. In your design, click on the HTML tab in the lower-left corner.
3. Place your cursor after the opening <head> and add a return. Copy and paste this code into the space:
<!--[if !mso]><!-->
<style type="text/css" data-inline-options="preserve: true; ignore: true">
@import url('https://yourfonturl');
</style>
<!--<![endif]-->
4. Replace the @import url with your font from Google or Adobe.
5. Check your code before closing the HTML tab.
Everything but the font URL should look exactly like the code in Step 3.
6. Set the font in your Stylesheet
Update your fonts at the global level by selecting Stylesheet > General Styles > Paragraph, and customizing your style options. Click inside the Font Family field and enter the font you have embedded. Note: When the font name includes a space, you must wrap the name in quotes.
About self-hosted fonts
Self-hosted fonts require server-side work and licensing permission from the font creator. The following details are provided to help you get started with helpful resources. WordFly Support cannot configure or troubleshoot self-hosted fonts.
- Configure CORS on your server to allow for cross-domain serving of your font assets.
- In your font code, you must:
@import a CSS file hosted on your domain with all the references to the font files embedded in them (via @font-face statements)
—or— Include the @font-face statements directly in the email
If using @font-face, use woff for the best support.
<style>
@font-face { font-family: 'selfhostedfontname'; src: local('selfhostedfontname'), url('https://www.domain/assets/fonts/selfhostedfontname.woff format('woff'); font-weight: normal; font-style: normal; }
</style>