A data field is essentially the column header in your spreadsheet when you import subscribers. Data fields tell WordFly which data you’re importing with your subscriber list. Data fields can also be used for email personalization and segmentation. Some data fields already exist for you in WordFly. You can also add your own custom fields.
WordFly data fields
These fields are included in your account by default. They contain the data that WordFly uses to send email and SMS campaigns.
| CrmSubscriberId | A subscriber’s unique customer number from a WordFly-integrated CRM |
| A subscriber’s unique email address, only one email per subscriber | |
| SMS Number | A subscriber’s mobile number (if SMS is enabled) |
| First Name | A subscriber’s first name |
| Last Name | A subscriber’s last name |
These fields are also included in your account by default. Use caution when importing data into these fields. Information in these fields can be used to identify an individual and constitutes personally identifiable information (PII) and personal data (GDPR).
You should only import this data if it is critical to your email campaign.
| Birthday | A subscriber’s birth date |
| City | A subscriber’s city |
| Country | A subscriber’s country |
| Phone | A subscriber’s phone number |
| PostalCode | A subscriber’s postal code |
| State/Province | A subscriber’s home state |
| Street | A subscriber’s street address |
These fields can be used with CRM integrations.
| CRMSubscribeDate | Subscribe date in your CRM |
| DownloadNumber | A promotion number from Tessitura CRM |
| SourceNumber | A promotion number from the CRM database |
These fields are used for subscriber profiles. They are only updated by WordFly.
| WordFlySubscribeDate | Date subscriber was first sent to and became active in WordFly |
| WordFlyOrigin | How subscriber was added to WordFly: WordFly Signup (1), WordFly Lightbox (2), or Import (list import - 3) |
| EngagementRating | Star rating based on engagement score |
| EngagementScore | Calculated based on user activity |
List and Subscriber data fields
There are two types of data fields: List and Subscriber data fields. Most WordFly data fields (except two) are subscriber data fields.
| List Data | Data that is specific to a list and changes often, e.g., Performance Name. List data fields are not saved to a subscriber’s record in WordFly because the data is based on a list by list import. |
| Subscriber Data | Data that is specific to a subscriber and rarely changes, e.g., Email address, First Name. Subscriber data is saved to subscriber records in WordFly. You could import First Name in one list and WordFly can use that data for future emails without it being imported on the list again. |
Create a new custom field
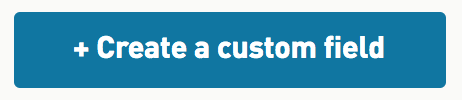
If you have a field header in your list and there isn’t a correct match for it in WordFly, you’ll need to create a new Data Field in WordFly before you import your list.
-
Go to Subscribers > Data Fields
-
Click 'Create a custom field'
-
Customize your Data Field...
- Type a descriptive name into the Name field
Be sure to only use alphanumeric characters for your data fields. Special characters such as parentheses, commas, and quotes can break your list imports. Dashes, spaces and underscores are acceptable. - Select a Field Type: List or Subscriber
- Select a Data Type: Text, Number, or Date. If you select either Number or Date another dropdown will appear to customize the data format.
- (Optional) Type a brief description
- Type a descriptive name into the Name field
-
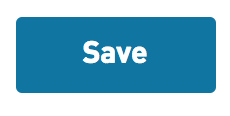
Click Save to add the data field to your library
Edit a custom field
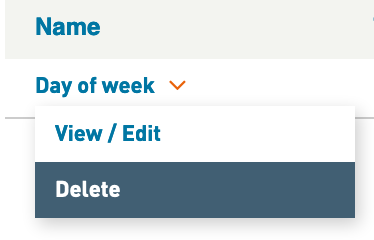
Descriptions on any data field can be updated. To edit a data field, go to Subscribers > Data Fields and find the data field you would like to edit. Click the name of the data field on the left side. Then select View/Edit to edit the data field description.

Delete a custom field
Important: When a data field is deleted any emails that use that data field will no longer be able to pull data into the View in Browser version of the email which is dynamically created when loaded.
To delete a data field, go to Subscribers > Data Fields and find the data field you would like to edit. Click the name of the data field on the left side. Then select Delete from the two available options.